
How to build an off road buggy
For many of us it is a dream to one day build an off road buggy. How cool is it to drive through the rough terrain on your self-built buggy. But where do you start? On the internet we see a lot of pictures of unfinished buggy projects. People who underestimated the building part or people who didn’t use proper building plans. To make sure your build is a success we give you our tips and trics and everything you need to know when building a buggy it. If you any questions or if you have something to add, let us know in the comments.
- What is an off road buggy?
- On what terrain can I drive?
- Factors to consider when start building
- Buggy building costs
- Where to start your off road buggy build
- What skills do I need?
- Required tools to build an off road buggy
- Which engines are suitable for an off road cross kart buggy?
- How to choose the right shock absorber for an off road buggy?
- What wheels and tires do I need?
What is an off road buggy?
A buggy is a lightweight motorized vehicle, which is particularly suitable for driving on unpaved terrain. A buggy is a recreational vehicle with large wheels, wide tires and is designed for use on dunes, forest or muddy tracks. Typically, a buggy consists of a roll cage made of tubes and a engine from a motorcycle. The design is usually a roofless vehicle with a rear-mounted engine. A buggy is created by making custom made parts, modifying existing parts and applying standard parts such as a motorcycle engine, drive shafts and brake calipers.
On what terrain can I drive?
Most DIY buggies are not road legal. But let’s be honest, do you really want to drive them on the asphalt? Buggies are primary build for unpaved terrain. It differs per type of terrain how you can best build the buggy and which setup to choose. A buggy to be able to drive in the dunes has a different setup than a buggy that is suitable for fine cornering.
Text continues below the image
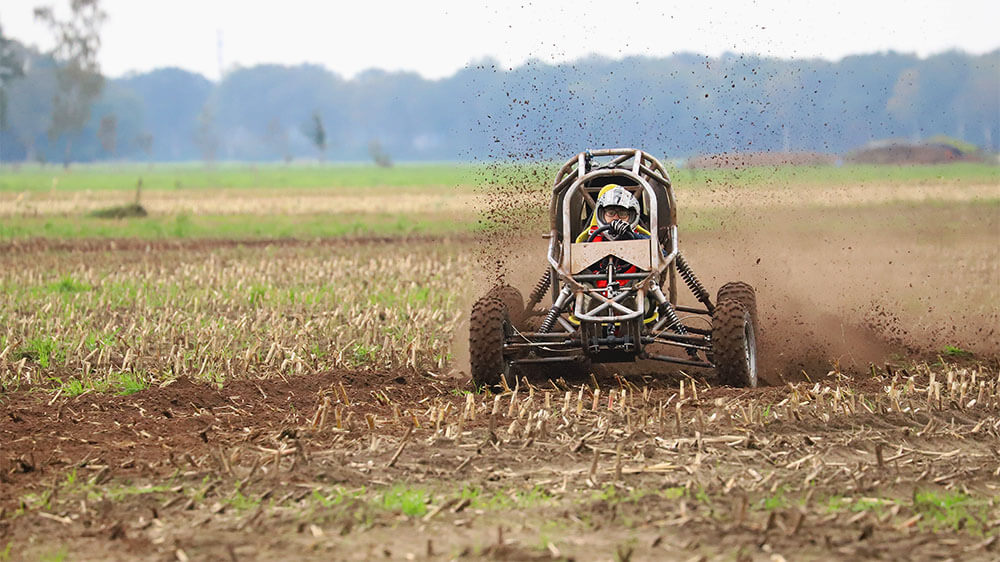
Our FX1000 off road buggy is specially designed for fast cornering on gravel roads. During the design, a lot of attention was paid to the geometry of the wheel suspensions of the buggy. This ensures optimal road holding and good handling properties. That makes it an easy to tame beast!
Factors to consider when start building
Building a buggy is not a job that most people do in two weekends. It is a job that must be taken seriously. It takes a lot of time, planning and of course resources. That said, it’s a project that anyone with a technical mind or the interest and will to learn could do. However, there are some things to consider when planning to build your own buggy.
Set up a proper building space
Whether you are going to build the buggy alone or with friends, it is important that you have a space where you can build the buggy. The space must of course be large enough for the buggy and it is advisable to provide the space with a workbench. The workbench is useful for assembling parts before mounting them on the buggy. It’s important that your can leave your buggy safely for a longer period of time so that you don’t have to clear everything while waiting for parts of time to work on it.
Time management
To be honest, it’s not realistic to think that you can build a buggy in a couple of weeks. A construction time that is too short will not benefit the end result. That said, it doesn’t have to be a multi-year project either. With one evening a week and every now and then a Saturday, it is certainly possible to complete the project within a year.
Make sure you can afford it
Although a buggy costs only a fraction of the amount of a WRC Rally car, it certainly takes a budget to build a buggy. How much strongly depends on how many parts you can produce yourself. Check in advance whether the financial part is possible. Selling you unfinished project is not recommended as there is a bad second hand market for unfinished buggy projects.
Buggy building costs
How much it costs to build a buggy really depends on which parts you can fabricate yourself and which parts you have to buy. If you can produce parts yourself, building a buggy will become cheaper.
Text continues below the image
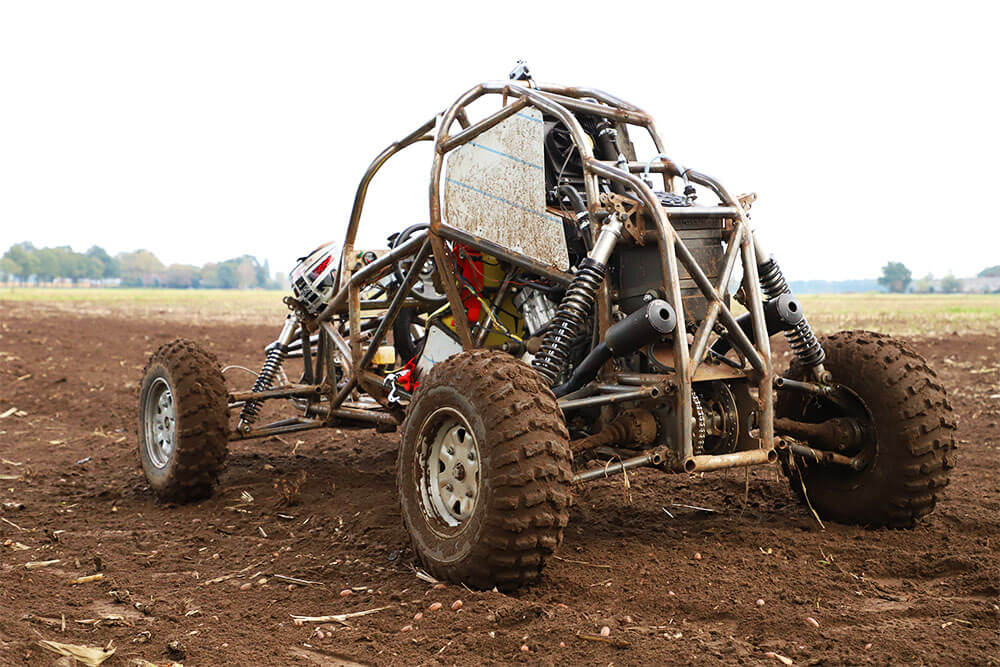
If you are going to produce parts yourself, you first need the building plans. In addition, you need the laser files to cut the sheet metal. The laser files can be loaded directly into a laser cutter. The laser cutter cuts the sheet metal exactly in the right shape.
If you do not have access to a laser cutter, it is possible to purchase the sheet metal from us. You can only get the sheet metal so that you can produce the other parts yourself. But it is also possible to get complete kits. In addition, it is even possible to purchase the complete buggy.
What you need to add to this is:
- Motorcycle engine, approx. €1000,-
- Shock absorbers, approx. €1100 (very depending on shock brand and type)
- Seat + harness, approx. €200
- Wheels and tires, approx.. €500
- Painting, welding, some small bits, bolts, electronics.
So in total you would be looking around €8.000,- to €12.000,- for a running vehicle. This will be cheaper if you produce parts yourself.
Where to start your off road buggy build
Anyone who has built a buggy before will advise you to start with the frame. The frame is the basis of your buggy and from there you build the buggy further. Building the frame starts with bending the tubes. Then saw or cut the tubes to the correct length. The frame plan shows in detail where and in which angles the tubes should be bent. It also indicates exactly the cut-out to connect the tubes with each other. The tubes are welded together with the sheet metal. When building the frame, it is important to properly fit in the engine and align the engine with the sprocket in the center hub. You still have the option of making minor adjustments. When the frame is ready, you can continue to build from here. The front suspension and rear suspension are a logical next step.
What skills do I need?
The amount of skills you need will strongly depend on whether you want to produce parts yourself. The laser files of our buggy are available with which you can produce parts yourself. The laser files can be loaded directly into a laser cutter. This way you can produce your own parts. In our plans, extensive descriptions are available for, for example, bending the tubes for the tubular frame. If you want bend an cut the tubes yourself, you need knowledge of operating machines to bend and cut pipes. In addition, we offer the possibility to purchase the laser-cut parts and bended tubes from us. In any case, it is important that you can read technical drawings. Our drawings are very comprehensive and easy to understand for a technically minded person. Needless to say, you will need to have some practice with welding.
Required tools to build an off road buggy
The required tools to build your own off road crosskart buggy depend on which parts you will be producing yourself. An absolute must is of course a well-functioning welding machine. It has to be a high power welding machine, preferably MIG/MAG. A powerful welding machine ensures a good fusion and a good joint. Especially for the tubular frame and the A arms a heavy welding machine is required. Other parts require a lighter welding machine. In addition, for best results, it is best to do some parts with a TIG welder. For example the exhaust, some smaller assemblies such as the pedal box and the fuel tank if you make your own. Good clamps, magnets and other welding products that you prefer will come in handy.
Text continues below the image
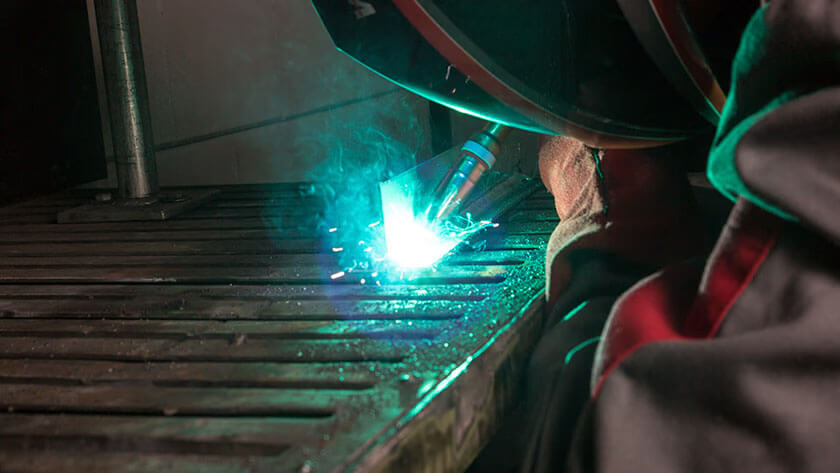
The buggy is designed to assemble as much as possible with standard tools. A standard, well-equipped toolbox is sufficient to build the buggy. No special tools are required. Only for mounting and dismounting bearings it may be useful to have a small hand press and heating device (oven or induction plate) and bearing pullers or punches.
Which engines are suitable for an off road cross kart buggy?
The buggy is designed for a motorcycle engine. Motorcycle engines are powerful engines with a compact design. The sequential gearbox and drive via a sprocket and chain make them extremely suitable for a buggy. Motorcycle engines are widely available all over the world and are mostly used from wrecked motorcycles. If it is your first buggy that you build, a 600cc engine is the choice to go for. It is important to choose an engine with sufficient power and torque. 100 to 140 hp is sufficient and preferably an injection model due to the wider power band that the electronic injection provides.
Text continues below the image
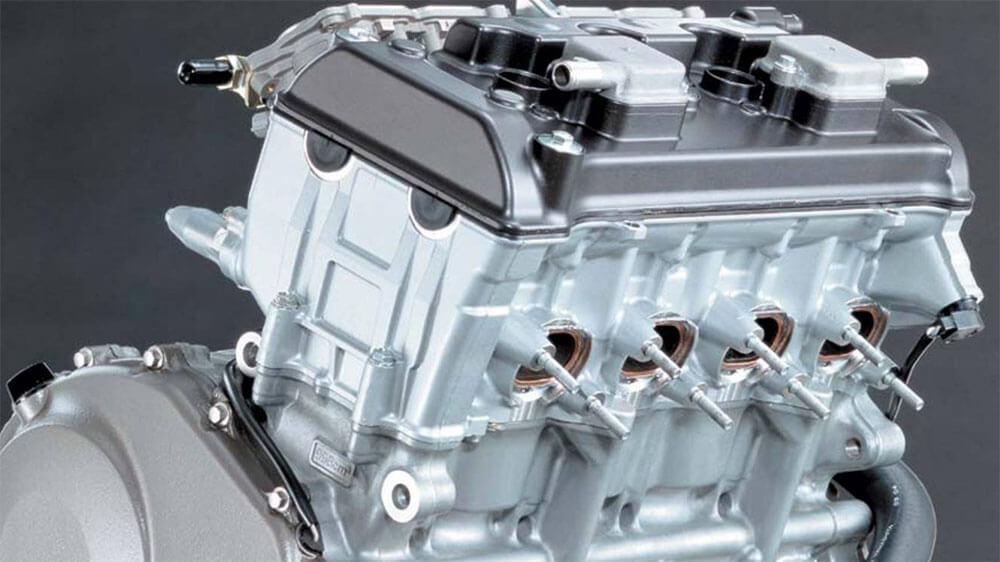
It is also good to look at the gearbox ratios and the corresponding top speeds. A high theoretical top speed can cause very poor traction. Traction is much more important than top speed. Traction ensures better drifting and ensures that the engine is faster at its ideal revs. It is important for motorcycle engines to stay in the ideal rev range to avoid a power drop after shifting.
The buggy is designed for engines with powers up to 180 hp and a torque no more than 120 Nm. Engines with more power do not contribute to a faster buggy because either the engine becomes too heavy or the power is only converted to wheel spin instead of traction. If your engine exceeds these numbers, please contact us before purchase.
How to choose the right shock absorber for an off road buggy?
Shock absorbers are inherent to safety. Even though it seems like an obvious and cheap choice to use shock absorbers from cars or motorcycles; this is a real no-go area. These kind of shock absorbers are made for different vehicles and use a setup for different undergrounds. This makes it very dangerous to apply this kind of shock absorber on a buggy. The buggy will be very unpredictable and especially dangerous when reaching high speeds.
Text continues below the image
There are a lot of shock manufactures in the world and depending on what country you are you can start to look for a local supplier. Check what shock absorbers are used in local events. The shocks that are used in off road competitions on gravel underground will have a good starting point. When you only use the buggy to play around on nearby fields, the high-end shock absorbers will be overkill and a waste of money.
You can use the dimensions given in the building plans to request a quote with any shock absorber manufacturer. Start by determining the wheel load on each tire by placing the buggy on 4 scales (1 on each tire) including oils, fuels and driver. Give this information to the shock absorber manufacture so they can customize the shock setup for your preference. We recommend to use our adjustable shock absorbers that have been selected on our buggy and have already been fully set and adjusted.
What wheels and tires do I need?
Heavy duty steel rims are recommended due to the buggy weight and the rough terrain driven trough. You will need at least 12” rims to fit the rear uprights. The diameter of the rear tyres corresponds directly to a difference in traction and top speed.
Text continues below the image
The gearbox ratio’s in motorcycle engines are setup for easy undergrounds (tarmac) and high top speeds. It is important to reduce this rpm and circumference speed of the wheels to convert these rpm’s to torque and traction. Therefore small diameters of wheels are necessary to avoid a huge number of teeth on your rear sprocket. A good combination to start with is a 12 teeth engine sprocket, a 60 teeth rear sprocket and 23” tires.
What are you using to couple the engine with the sprocket ?
Hi Eddie, thanks for your message. The engine can be equipped with a standard 530 motorcycle sprocket. The sprocket on the center hub is driven via a 530 chain. Please see our Rear Suspension for detailed images.
Can I use a 1300 v star Yamaha shaft driven motor
Hi Larry, unfortunately this is not possible, our standard rear suspension requires it to be chain driven. A motor with a sprocket is therefore a requirement.
Is there a way to buy the frame prewelded?
Hi, thank you for your message, please send us a message through the contact page.
Hello Gentleman,
I want buy the complete plans. Ist it possible to get it in 3D files?
Thank you very much.
Regards Benjamin Frommherz
Hi Benjamin,
You can get the DXF files to build your Crosskart Buggy.
With these files you can produce your own part.
Please let us know if you have any further questions.
Cheers,
FX Buggy
Hi
I have a 96 Suzuki Gsx R750 engine.
that is good for a frame like this?
Hi Martin,
Although we prefer injection over carburettors we think this engine is a great starting point. Good luck and we like it if you keep us posted about the build!
Cheers
I downloaded the free plan and are in process of getting the cash to buy the rest of the component plans, stupid question I jave tried to find it but what diameter and wall thickness is used. Many thanks in advance
Hi Gert, to build the buggy frame you need seamless tubes with a diameter of 40×2.0. I hope you can continue with this info, good luck with the build and if you have any questions let us know. Cheers
Hello, could i build the frame without needing the laser files.
Hi, yes if you buy the frame you don’t need the laser files. You only need the laser files if you want to produce the parts yourself.
What step should I follow after building the frame?
Hi, when building the frame, it is important to properly fit in the engine and align the engine with the sprocket in the center hub. You still have the option of making minor adjustments. When the frame is ready, you can continue to build from here. The front suspension and rear suspension are a logical next step.
Hi, thanks for the information. What about transmission? And what about reverse? I want to build a light weight buggy with only 30 hp so most motorcycle in that range dont have a reverse gear…
Hi,
Motorcycle gearboxes do not have reverse. This is normally not a problem, the buggy is quite light and therefore easy to push backwards. You indicate that you want to use an engine with 30 hp. This does not provide an ideal experience with our FX1000 buggy. We recommend using a more powerful engine, for example a 600cc motorcycle engine.
Cheers
hi, I’m wondering if I can some how use a predator 212 racing engine and what type of axle do I use for the rear
Hi Jasper, thank you for your message. We recommend using a motorcycle engine of 600cc or higher for our FX1000 buggy. These types of engines are high rpm engines and are equipped with a sequential gearbox. These types of motors provide more than enough power to move the buggy well through rough terrain. Think of engines from, for example, a YZF-R6, CBR 600 or a GSX-R600 motorcycles.
Cheers.
Hi, which CV drive shaft area used in these FX1000?
Hi Gaith,
The drivetrain of the FX1000 buggy is designed for BMW E34 drive shafts. The flanges of the center hub and the upright are suitable for BMW E34 drive shafts that are widely available. Let us know if you have any other questions.
Cheers
Hello, just wondering whether it would be possible to use this type of tube bender (see link attached) to bend the tube for the frame?
{edit: link removed}
Thanks
Hi Conner,
Thanks for reaching out to us. Buggy frames use thin wall tubes. These tubes need to be bent with a mandrel bender or a bending machine where you pull a mandrel over the outer radius of the tube. The machine shown in the link does not have a mandrel and will kink the tubes. Let us know if you have any more questions.
Cheers,
FX Buggy